Preparation
For this process, cPanel Reseller accounts will be the starting point. Any information related to Root accounts can be found in cPanel Style Documentation. Here are a few assumptions of what you’ll need to have:
- cPanel & WHM 11.50 or later
- Reseller account
- Basic knowledge of HTML/CSS/JS
- Basic Command Line
- Design software
Game Plan
Like any project, you’ll need to come up with a game plan. Start by figuring out the areas you wish to customize. Customization can range from colors and layout to simple behavior interactions. You’re only limited by your imagination!
Once you have an idea of the changes you’d like to make, take the time to draw it out. This will help you achieve your vision without losing sight of your objectives. Think of it as your goal post.
Brand customization
To increase brand awareness, it’s beneficial to provide your customers with a way to identify and associate your brand with the cPanel dashboard. Here is the first course of action necessary to change the cPanel logo to your custom logo.
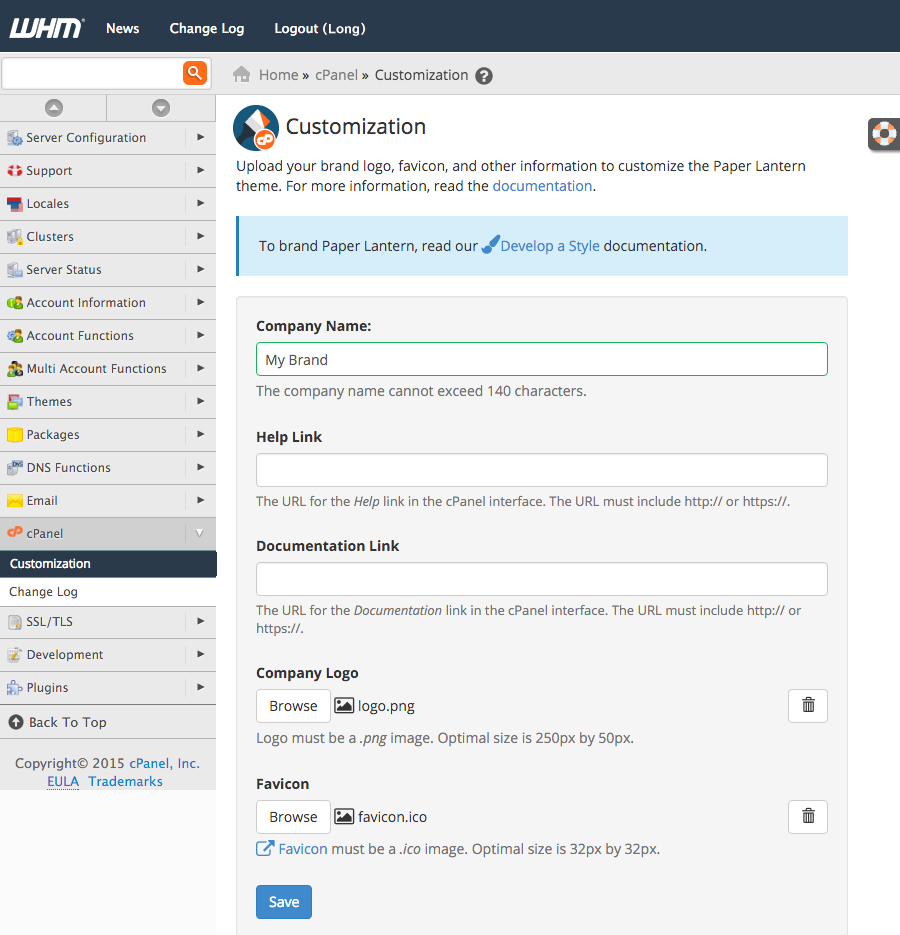
- Log into your WHM dashboard [ex: http://yourdomain.com/whm]
- Navigate to
cPanel > Customization - Type in your company name
- Upload your company logo
- Upload favicon
- Click Save
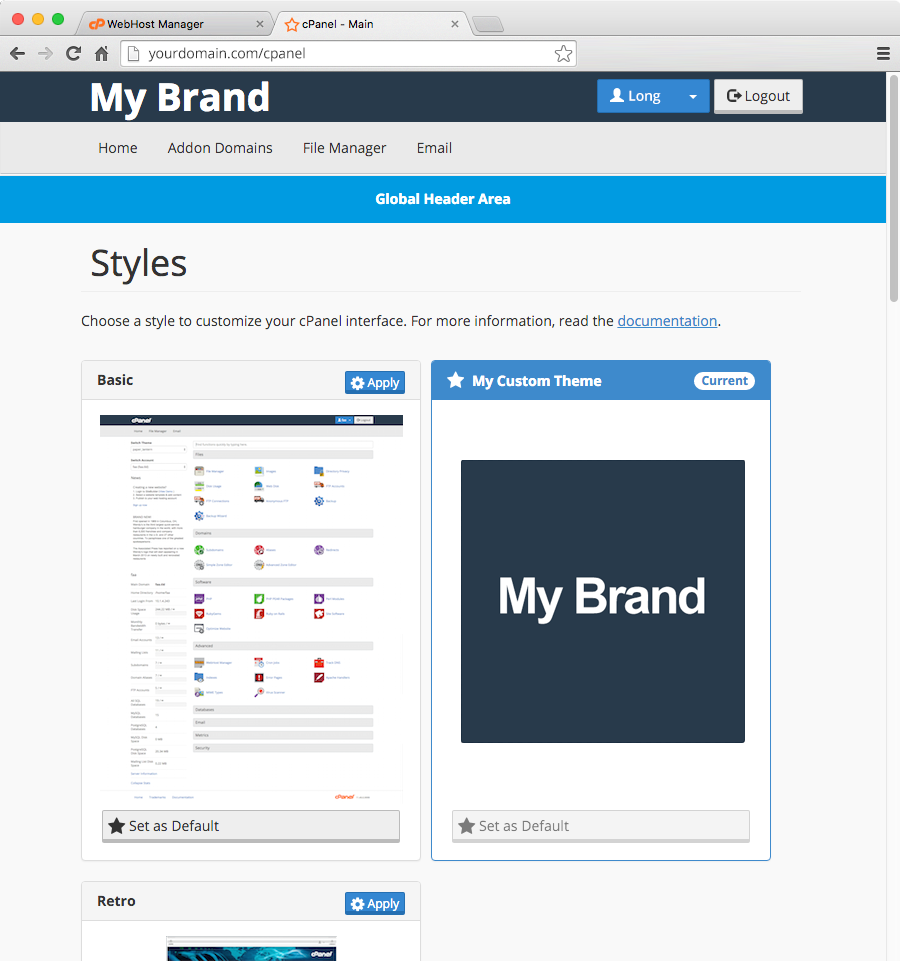
When you’re finished, switch and log into the cPanel dashboard [ex: http://yourdomain.com/cpanel] and you’ll notice your logo and favicon have been updated.

Theme
The bulk of customization is done through CSS. The diagram below shows the common elements, in IDs and Classes, that allow you to specify and modify the custom style.
Pro Tip:
You can use your mouse and right-click on any area in your Chrome or Firefox browser and select inspect element within the cPanel dashboard to identify existing IDs and Classes with the style code. Inspecting elements and the steps below will show how each design can be overridden to your custom style.

- In your cPanel dashboard – navigate to
Home > Filesand select File Manager - In File Manager, navigate to, or create the directory
var/cpanel/reseller/styledif it doesn’t exist - Under styled folder – create your folder name for the theme: ex: My_Custom_Theme
- Within the same directory – create a new file and name it styles.css (must be exactly as it’s spelled and in lower caps)
- Right-click styles.css and click edit
- In your styles.css type in the following
.navbar-preferences {background-color: blue;} - Save Changes
- Change your style to your custom style (User Preferences > Change Style) and select Apply on My Custom Theme (you’ll notice the background color on the navbar has changed in your cPanel dashboard). This is your theme.
- To include a preview image on the Change Style interface. Screen capture your new interface or design your preview image (500 by 500 pixel and png format), save the file name to preview.png, and upload it under the My_Custom_Theme directory.
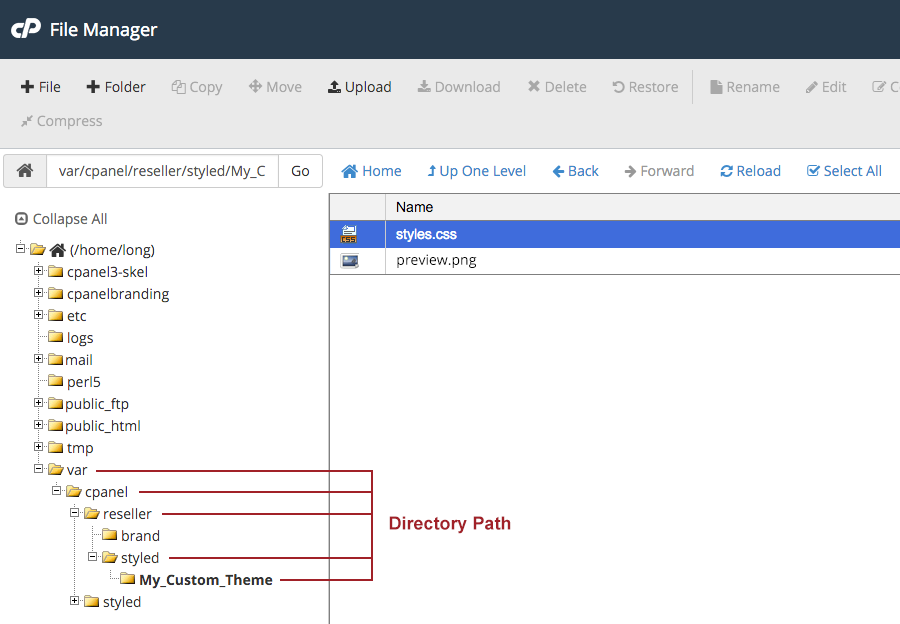
By now your directory path should look similar to the image you see above.
I encourage you to keep tinkering with your CSS style until you’re satisfied. For further information on styling elements, you can read through cPanel documentation on setting up your stylesheet or writing your custom CSS.
Content
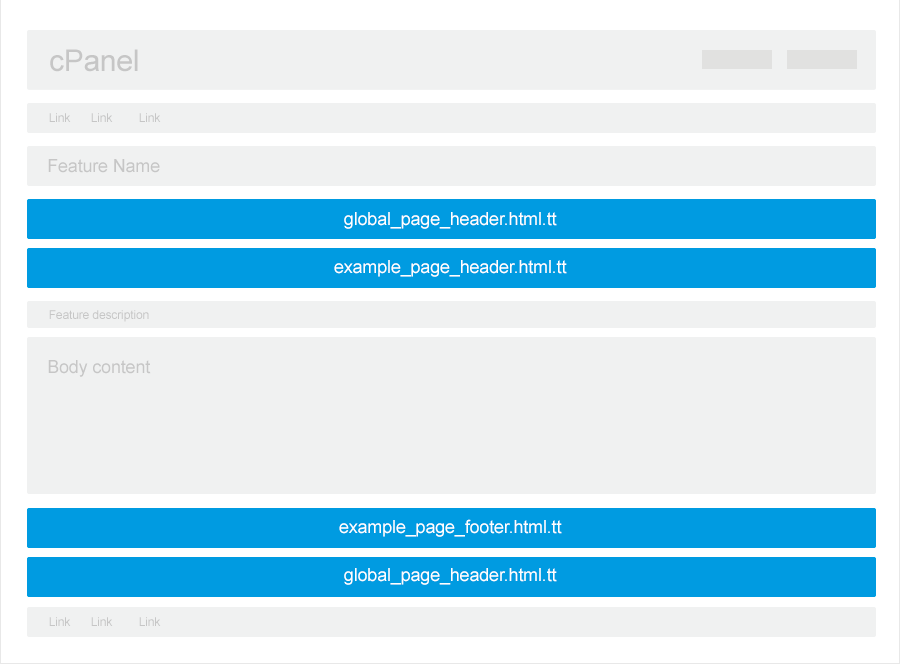
Sometimes styling the layout isn’t enough. There might be occasions when additional pieces of information should be included in the dashboard. As of now, there is a total of four available areas where you can include your content. The first two areas are GLOBAL header and footer positions which show up on every page. The GLOBAL positions filename is”global_header.HTML.tt” and “global_footer.HTML.tt”. Then the other two are PAGE TEMPLATES header and footer positions which only show up in the named app. The PAGE TEMPLATES positions filename is “_page_header.HTML.tt” and “_page_header.HTML.tt”. With these content additions, you have the option to include plain text, HTML, CSS, and JS to extend your UI enhancement further.
For this example, we’ll add content on both global and page templates using an FTP account.
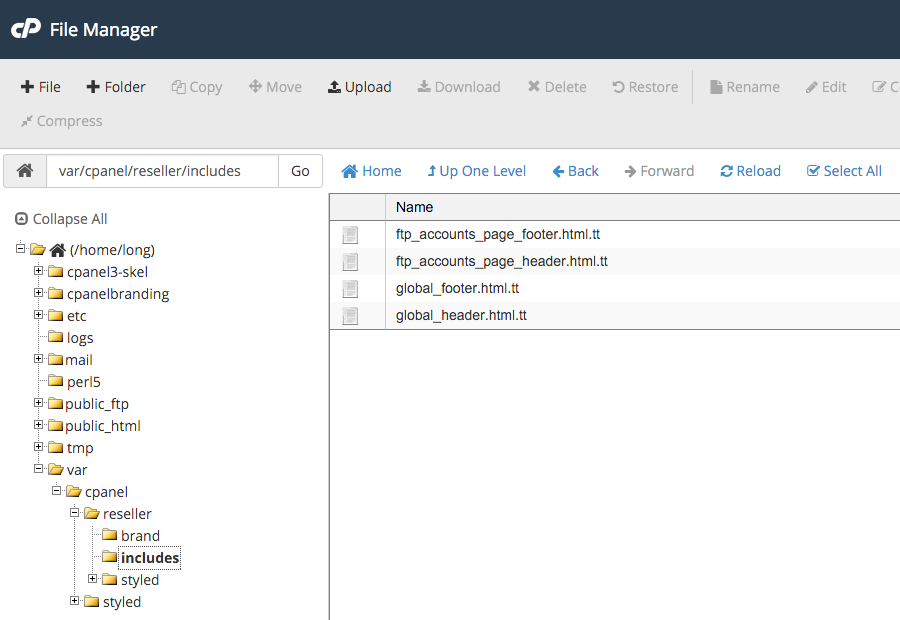
- In your File Manager – create a folder name includes under this directory
var/cpanel/reseller/ - Under the includes folder – Create the following files and name them exactly below:
global_header.html.ttglobal_footer.html.ttftp_page_header.html.ttftp_page_footer.html.tt
To view the filenames on different page templates, visit documentation at Customize Content in Paper Lantern
- Within each file, enter the following code:
- Global Header:
<div style="background-color: #82b74c; color: #fff; font-weight: bold; padding: 15px; text-align: center;">Global Header Area</div> - Global Footer:
<div style="background-color: #82b74c; color: #fff; font-weight: bold; padding: 15px; text-align: center;">Global Footer Area</div> - FTP Header:
<div style="background-color: #82b74c; color: #fff; font-weight: bold; padding: 15px; text-align: center;">FTP Header Area</div> - FTP Footer:
<div style="background-color: #82b74c; color: #fff; font-weight: bold; padding: 15px; text-align: center;">FTP Footer Area</div>
- Global Header:
- Save
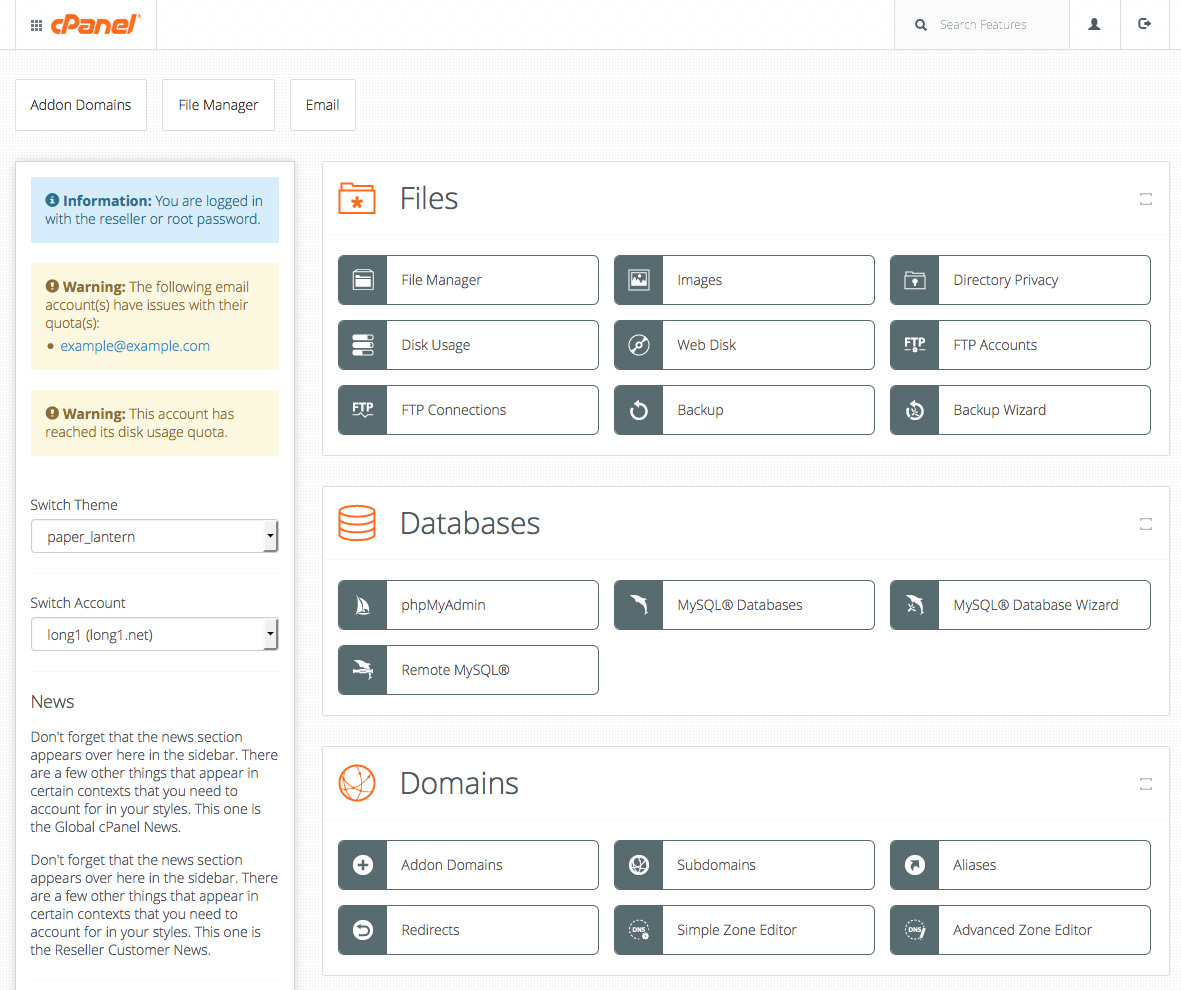
Go to your cPanel dashboard and refresh your browser. You’ll notice all pages have global content and the FTP accounts page only include specific content for that page.

Icon
The default cPanel icons are there to help users quickly identify the tools they need, however, they may not complement your custom design or style. Before moving forward, ensure that your custom icons are no bigger than 48x48px, alpha-transparent (no background color) and that they are saved in png format.
-
- Design your custom icons. For this example let’s redesign the FTP Accounts icon.
- Visit Paper Lantern’s apply documentation and find the icon you wish to replace. In this case, the app key for FTP accounts is ftp_accounts.png so your custom icons should be saved as ftp_accounts.png.
- In your File Manager – navigate to
var/cpanel/reseller/styled/My_Custom_Theme/and create a folder name icons
- Upload your new icons ftp_accounts.png under the icons folder
- This is the only place where you’ll need to use the terminal (mac) / command prompt (pc). Open up your terminal/command prompt and type the following:
-
ssh reseller@server.example.net -
password: <enter your password> -
/usr/local/cpanel/bin/sprite_generator – theme paper_lantern – style My_Custom_Theme
(replace ssh login credential with your username/server name and My_Custom_Theme to your theme name)
-
Go to your cPanel dashboard and force-refresh your browser. You should see your new FTP accounts icon.
![]()
You can continue to design your icons and upload them all at once. When done, simply follow the steps above. It will generate the images and override the existing Paper Lantern icons.
Set your style to default
The last step is to set your default style to your custom design. Simply go to User Preferences > Change Style > Set as Default one of your custom designs. Once enabled, the new and existing hosting account will automatically see your new custom branded dashboard.
Build it and be known
There you have it, folks! You now have the skills and knowledge to rebrand the cPanel dashboard your way. The possibilities are endless. Take control of your brand. There’s nothing but pure joy when it comes to creating your own identity and setting yourself apart from others.
Share your design in the comment section or on our forums. Below are a few examples of what you could do with your new branding skills and cPanel.


Paper Lantern Caveat
When creating your design style, it inherits all of the functionality and styling of Paper Lantern. This means Paper Lantern is your master template. Because Paper Lantern is constantly evolving and the code is frequently updated, your custom designs could potentially be affected. Visit our release site or subscribe to our mailing list so you can be notified of any changes that may affect your masterpiece.
]]>Require a Minimum Password Strength
We all know….well, we all should know the difference between a secure password and an insecure one:
Less secure: amy1234
More secure: ~4my0n3tw0thr334
With that in mind, ensuring your mail account holders are using secure passwords is one of the simplest ways to protect their information. While capitalization, symbol usage, and spelling all factor into password security, as a hosting provider, you can set a character minimum to ensure that all of your users have a base level of protection.
Learn more about Password Strength Configurations>>
Enable cPHulk
Familiar with the 2012 Marvel film The Avengers? In the final battle sequence, a seemingly unstoppable (keyword) alien army attempts to take down NYC — that is of course until the neurotically lovable Bruce Banner turns into his not-so-jolly green alter ego.
cPanel & WHM includes its own secret weapon that was developed to defend against the onslaught of brute force attacks. By enabling cPHulk, you can drastically prevent brute force attacks from affecting your users, your accounts, or your machine. Simply toggle the feature on from your Security Center and prevent malicious software from trying to muscle through your password security.
Find out the full power of cPHulk by reading our Documentation Site>>
Enable SMTP Restrictions
All online activity happens through a series of rules called protocols. For mail, SMTP, or Simple Mail Transfer Protocol, is the method used to submit messages to mail servers for delivery to the recipient.
With SMTP Restrictions, a feature you can enable straight from WHM, you can prevent spammers from directly interacting with your remote mail servers or even working around your mail security settings.
Curious about SMTP Restrictions? Find out more here in our Documentation>>
There are, of course, many more ways you can up the security on your mail server and protect your customers. If you found this article helpful, be sure to share it with others. If you have a few tips for mail security worth mentioning, let us know by leaving a comment below.
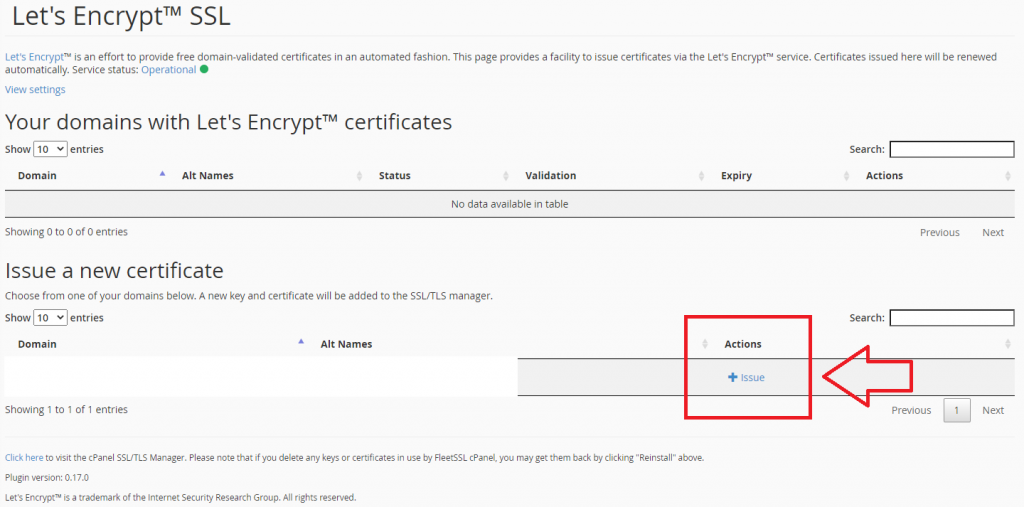
1) Open your cPanel hosting account. Scroll down to SECURITY tab and click on Lets Encrypt SSL tab.

2) When Let’s Encrypt Certificate APP will open click on ISSUE button to install certificate on your domain.
3) Then check the button for cPanel subdomains after that click on ISSUE button to start the installation processes it will take 2 to 3 min to install certificate on your domain.
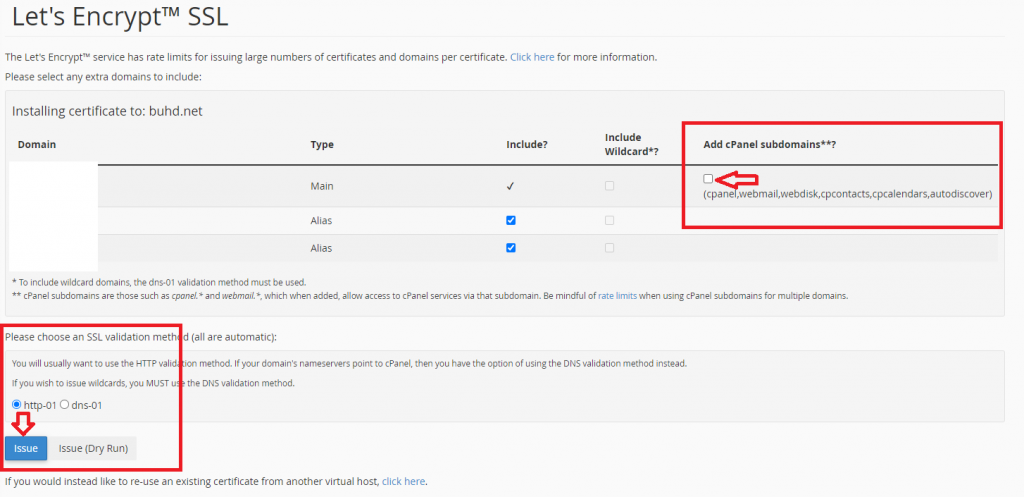
4) Your Free SSL certificate has been installed on your domain.

Important!
EasyApache 3 was deemed completely end of life on . Anyone using the latest version of cPanel has been migrated automatically to the new system. These directions are for those people using end-of-life versions of cPanel (v76 or earlier).
You should immediately upgrade to EasyApache 4 (if you haven’t already) to avoid some potentially serious security issues.
EasyApache is the name of the cPanel system that installs and updates the Apache web server on supported operating systems.
If you are using an older version of cPanel, here is how to migrate from EasyApache 3 to EasyApache 4.
Converting from Within WHM
Follow these directions if you prefer to try the conversion from WHM.
- Log into WHM as root. Typically you can do this by accessing https://YOURSERVERNAME.COM/whm (Replace YOURSERVERNAME.COM with the sever’s hostname or your server’s main IP address.)
- Check to see if you are still using EasyApache 3 by selecting EasyApache 3 from the Software section of the WHM sidebar on the left. If you don’t see that option, you either aren’t logged in as root to WHM or your server is already converted to EasyApache 4 or you are using cPanel v52-58,
- If you are using EasyApache 3, you will see an EasyApache 4 Migration link near the top of the screen. Click on it.
- The system will walk you through the process of converting to EasyApache 4.
- The tool will warn you about any conditions that stop the conversion from happening. If so, address any reported concerns and try again.
- When complete, check your websites to make sure they work as expected.
- Errors after conversion are most often caused by incorrect directives in .htaccess files. Try removing any PHP directives from there or any custom php.ini files and then try setting the needed PHP options in that domain’s cPanel account instead.
Converting from the SSH Shell (Command Line)
You could also choose to handle the conversion to EasyApache 4 from the shell when you are logged into SSH as the root user.
cPanel Inc. recommends that this command gets run as the root user and not as a wheel user executing as root.
- Log into SSH as root to the server you want to convert.
-
Execute the following command:
Convert EA3 to EA4/usr/local/cpanel/scripts/migrate_ea3_to_ea4 --run
- The tool will warn you about any conditions that stop the conversion from happening. If so, address any reported concerns and try again.
- The conversion process will begin.
- When complete, check your websites to make sure they work as expected.
- Errors after conversion are most often caused by incorrect directives in .htaccess files. Try removing any PHP directives from there or any custom php.ini files and then try setting the needed PHP options in that domain’s cPanel account instead.
If you’d like more information about what the conversion process actually does, review the following documentation from cPanel Inc.:
https://documentation.cpanel.net/display/EA4/How+to+Install+or+Uninstall+EasyApache+4
https://documentation.cpanel.net/display/EA4/The+EasyApache+3+to+EasyApache+4+Migration+Process
Changing a Domain or Subdomain’s Active PHP version
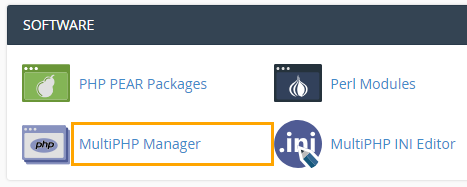
Start by opening the MultiPHP Manager interface by navigating to: cPanel >> Software and then clicking on MultiPHP Manager:

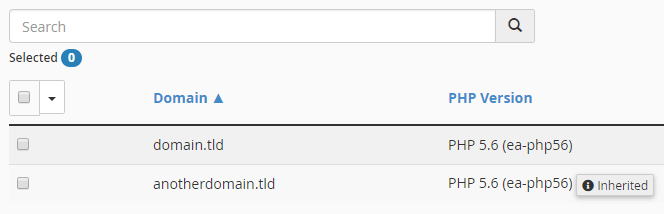
Check the boxes on the row of each domain you want to change in the Set PHP Version per Domain section:

Select the PHP version from the list on the right-hand side of the screen above the domain list, and then click Apply:

The altered domains should now reflect the updated PHP version accordingly in the list:
Can I Modify the PHP Version for a Single Directory?
Yes, this is possible in most cases under EA4, but unfortunately not from within cPanel itself. It requires manually adding some information to certain files in your account and is beyond the scope of this particular article.
]]>Changing a Domain or Subdomain’s Active PHP version
Start by opening the MultiPHP Manager interface by navigating to: cPanel >> Software and then clicking on MultiPHP Manager:
Check the boxes on the row of each domain you want to change in the Set PHP Version per Domain section:

Select the PHP version from the list on the right-hand side of the screen above the domain list, and then click Apply:

The altered domains should now reflect the updated PHP version accordingly in the list:

To access the Cron Jobs Menu, click on the corresponding icon located in the Advanced section on the main screen of your cPanel interface.
Adding a Cron Job
Step 1: To access the Cron Jobs Menu, click on the corresponding icon located on the main screen of your cPanel interface.
Step 2: (optional): Enter the email address where the cron output will be sent to in the corresponding field.
Step 3: Enter the command you wish the cron job to run in the blank field next to the Command field.
Step 4: Select how often you wish the command to be run by selecting an option in each of the boxes or by selecting a predefined period from the Common Settings drop-down menu.
Step 5: Click on Add New Cron Job to save your changes and set up your cron job.
Important The command run by the cron job must be a valid command.
]]>Here’s what you need to do to fix it.
Login to your control panel and browse to the “Change Password” page under “Site Management” from cPanel and reset your domain password and try to run phpmyadmin again,
if it doesn’t work still, open a ticket via client area.
]]>Login to your account as you normally do and click on the “Chanage Password” link >> enter your old and new password as required >> click on “Change your password now!” button
Logoff cpanel and log back in, if you still have a problem open a ticket with your cpanel login information
]]>You can then edit your database from phpMyAdmin.
If you have created the database in cPanel and you are still getting this error, look for a line in the beginning of your .sql file that contains “CREATE DATABASE” and remove that entire line. Now you should be able to complete the restore.
]]>