This guide explains how to add, grow, and shrink partitions of a AKLWEB HOST cloud server with GParted, a graphical partition editor. If you have upgraded your cloud server with a larger disk or need to expand a partition while preserving data, follow these steps. A cloud server instance is sometimes called a Virtual Private Server or VPS.
This guide temporarily boots your cloud server with the SystemRescue x64 ISO to run GParted, which works with a majority of operating systems.
1. Make a Backup
âš NOTE: These operations make destructive changes to the cloud server’s file system. You can lose data if you make a mistake following these directions. Make a snapshot of the server before performing any of these steps. If your data is critical, please test the snapshot before proceeding. Deploy a new test instance with the snapshot, then verify the test instance boots and has the correct data.
2. Boot SystemRescue
- Navigate to your cloud server information page.
- Click the Settings tab.
- Click Custom ISO on the left menu.
- Select SystemRescue from the ISO Library drop-down.
- Click Attach ISO and Reboot.
3. Launch GParted
- Open the web console from the server information page.
- Type ENTER to select the default, Boot SystemRescue using default options.
- Enter
startxat the root prompt. - When the graphical desktop appears, navigate to System > GParted.

Check a Partition
Before making changes, check the partition for errors. Right-click on the partition and select Check, which adds the operation to the pending queue.

To run the check, click the Apply All Operations icon in the toolbar. Click Apply on the pop-up confirmation dialog.

Grow, Shrink, or Move a Partition
Right-click on the partition you want to modify. Choose Resize/Move.

Adjust the partition by dragging the size handles, or adjust the size fields, then click Resize/Move, which adds the operation to the pending queue. Next, click the Apply All Operations icon to resize the partition.

Add a Partition
Right-click an unallocated area and choose New.

Enter the partition information, then click Add to add the operation to the pending queue. Next, click the Apply All Operations icon to resize the partition.

Detach and Reboot
When all operations are complete, detach the ISO and reboot the server. Navigate to the server information page and click Remove ISO.
Next Steps
If you added or removed partitions, you may need to adjust the mount points in /etc/fstab. Refer to the fstab documentation or the documentation specific to your distribution.
More Resources
]]>Running an HTTP server will allow you to host a web site and put up files for download. Apache is open-source software and one of the top HTTP servers available.
Bundled packages
If you just want to get a Web server running quickly, you can install one of the ready-made packages such as XAMPP which include Apache, PHP, MySQL, and an easy to control interface. Even when using such a package, there are no constraints when it comes to modifying the server configuration. However, for an advanced setup, you may want to manually install your web server.
Installing Apache
Download the Windows MSI installer from the Apache download page and fill in the details. Choose “All Users” and “Service” mode. You will most likely want to leave the port at 80, but you can change it. You simply need to make sure that this port is opened in the Windows Firewall.
After running the installer, the Apache Monitor will have been installed. You can control the status of Apache services from this application – using start, stop, and restart. You can also do so from Windows’ services.msc. By now, you should be able to contact your server on http://127.0.0.1 and see the default Apache page.
You can add, edit, and remove web files from your web server by changing the htdocs folder within the Apache folder. This is the default location for web files. Alternatively, you could make use of virtual hosts in order to use other directories, or set up sub-domains.
Apache has two important configuration files: .htaccess, which applies on a directory-by-directory basis within the web files, and httpd.conf inside Apache’s conf folder, which addresses the main configuration.
Installing PHP
PHP allows you to make use of PHP scripts on your web server and display the results to users.
Download the Windows version of PHP from PHP Windows downloads. Download the proper version and then extract the zip file to c:\php.
Next, edit Apache’s httpd.conf to include the following:
LoadModule php5_module "c:/php/php5apache2_2.dll"
AddType application/x-httpd-php .php
PHPIniDir "C:/php"
You should then restart the Apache server. In order to test PHP, create a test.php file in your htdocs folder with the following content:
<?php phpinfo() ?>
… then check the output at http://127.0.0.1/test.php.
Your Windows/Apache setup is complete.
]]>Step 1: Installing hMailServer
The first thing we need to do is to download hMailServer. The downloads are available on the offical site. Download the latest version.
Launch the setup when you’ve downloaded the .exe file. Click “Next” and agree to the license agreement. Select “Full installation”, because we’re not going to manage another server, but we’re going to use this server as the mail server.
Click “Install” to proceed. The installation takes about 20 seconds.
Step 2: Adding a domain
When you start hMailServer, you will see that there’s only one server that you can connect to: localhost. This is the mail server. Double-click the mail server to connect to it.
When you connect for the first time, you will see that no domains have been added yet. Add one by clicking “Add domain…”. You will be able to receive email on that domain name. Now enter your domain name and save.
You will see that your domain name has been added to “Domains” in the sidebar.
Step 3: Adding an email account
Now that we have added the domain, we are able to add an email account. Click “Accounts” in the sidebar. All email addresses will then appear. A new account can be added by clicking “Add…”.
The address is the first part of the email address you’re going to create. Say you want to add “info@example.com” – you would input “info” into the address field. Enter your password where it says “<< Encrypted >>”. You can set the maximum disk space that an email address can use. This is specified with the “Maximum size” option. Note that this unit is in MB. Click “Save”.
Step 4: Configuring hMailServer
In order to ensure that hMailServer works, there are a few things we need to do.
First, go to “Settings -> Protocols -> SMTP -> Delivery of e-mail”. You need to use your ISP’s SMTP relayer if you have a dynamic IP. If not, you can leave this field empty.
Step 5: Setting your DNS
In order for your mail to even arrive at the mail server, you need to add an MX record to your domain. This process varies depending on the registrar you used to purchase your domain. If you’re not sure how to add an MX record, contact your registrar.
Step 6: Opening your firewall
You need to open some ports in your firewall in order for the mail server to be able to send and receive mail. These ports are:
- 25 and 110 for SMTP and POP
- 143 for IMAP
Step 7: Accessing your email
At this point, we have a mail server setup. To access your mail server, you can setup a web mail client, or an application on your computer such as Outlook or Thunderbird. If you use an application on your computer, the username should be your email address and the authentication type is “password”.
]]>Step 1: Installing IIS
Installing IIS is incredibly simple; in fact, the only thing you have to do is enable it. To enable IIS, go to “Server Manager -> Manage -> Add Roles and Features”. Select where you want to install IIS. In the “Select server roles” screen, enable “Web Server (IIS)”. Click “Next” to finish the install.
Step 2: Adding sites
Using IIS with multiple sites is very easy. Let’s go ahead and add our first site! What you need to do is open the “IIS Manager”. This application is where IIS and all sites are managed. You will see all of your servers in the sidebar. Expand your server by double-clicking on its name, then expand “Sites”. All sites hosted by IIS are shown here.
In order to add a new site, simply right-click on the screen that appeared and select “Add Website…”. Here you will be asked for a number of things: the site name, application pool, physical path, binding, and host name.
The site name can be anything you want. It’s up to you what you put there. If you just want to host a website, don’t worry about the application pool; you won’t need to change it.
The physical path is where the website files are stored. The path for this should be: C:\inetpub\wwwroot. If you host multiple websites on your IIS server, then add a folder for each website in the wwwroot folder.
For the binding, select if you’re going to use either http:// or https:// for your website. The IP address should be the external IP of your server. IIS will detect that automatically. The port specified is the port that you want to host your website on; usually, this is port 80.
The host name is the domain name for your website. Say that you want to host “http://example.com”, you put “example.com” there.
Step 3: Starting and stopping websites
With IIS, you can easily disable websites by “stopping” them. This can be done by going to the website, under “Sites -> Website Name”, then clicking “Stop” in the sidebar.
You can “Start” or “Restart” a website in the same fashion.
Step 4: Installing applications
You can upload files from your computer to install a web application. If you want to use a CMS (such as WordPress or Joomla!), then installing it with the Web Platform Installer would be logical. You can compare the Web Platform Installer with Softaculous. Web Platform Installer also allows you to install other applications, such as PHP and SQL Server.
To install an application with the Web Platform Installer, find “Deploy” in the sidebar. Then click “Install Applications From Gallery”. You will now be able to search for applications and easily install them by clicking on the “Add” or “Install” button.
Step 5: Setting up authentication
You may only want certain people to have permission to access your website. For this, you can use HTTP authentication. The most popular type of HTTP authentication is “Basic Authentication”.
Authentication can be enabled by clicking “Authentication” under “IIS”. When enabling basic authentication, users with an account on your server will be able to access your website. Active Directory accounts can be used as well.
By default, anonymous authentication is enabled. This means that authentication is not required.
Step 6: Setting up SMTP email
If you have an application such as WordPress or Joomla installed, they will probably send users some emails. For this to work, we need to setup SMTP. To install SMTP with IIS, go to “Server Manager -> Manage -> Add Roles and Features”. You can skip selecting the roles, instead you’re going to tick “SMTP server” when it asks you to select the features you want to install.
The icon “SMTP E-mail” will now show up in IIS under “ASP.NET”. Here you can set the email address that emails are sent from.
Step 7: Enabling compression
You probably want to enable compression. Compression will make your website faster. To enable compression, simply click “Compression” under “IIS”.
Step 8: Using the web.config
If you’re used to using the .htaccess, then you’ll need to learn how to use the web.config. The web.config file is basically the equivalent of .htaccess. It provides a lot of the same features, but has a different format.
Step 9: Enabling SSL
In order to enable SSL, you’ll need an SSL certificate.
The first thing that we have to do is change the binding of the site from http:// to https://.
Click on your server name in the sidebar and click on “Server Certificates” under “IIS”. In the sidebar, you will see the option “Import…”. Use this to import your SSL certificate.
When you have imported your SSL certificate successfully, right-click on your site name in the sidebar and click “Edit Bindings…”. We’re going to add a binding. Click “Add…”. Instead of http://, choose https://. The IP address and host name will be the same; however the port will be set to 443. When you set the site to use https://, an option called “SSL certificate” will appear. Select your SSL certificate here. Click “OK”. When you see the new binding appear, click “Close”. Your website now uses SSL.
Policies are basically “rules”. Say that you have a marketing and a sales department. Now let’s assume you trust the sales department more than the marketing department, and you want to allow them to change the background of their computer. With a policy, you can set that the sales department can change their desktop background, but the marketing department cannot.
Step 1: Creating a group in Active Directory
Before you can assign policies to groups, you need to create the group first. This can be achieved by accessing “Active Directory Users and Computers” on Windows Server. In the sidebar, you will see your domain. Expand it by double-clicking it. You will now see a number of folders. The first thing that we have to do is to create an OU (Organizational Unit). To do this, right-click your domain, go to “New -> Organizational Unit”. Give it an appropriate name, such as “Departments”.
Next, double-click “Departments”. As we do not yet have any users or groups, it will say “There are no items to show in this view”.
Let’s add a group so that we can later assign users to it. To do this, right-click your Organizational Unit (“Departments”) and go to “New -> Group”. Enter a group name (“Marketing”) and Windows will automatically enter the pre-Windows 2000 group name. You can leave the “Group scope” and “Group type” default.
Click “OK”. You have created a group.
Step 2: Add a user
Now that we have a group, we want to add a user so that we can assign the user to the group. To do this, right-click on your Organizational Unit (“Departments”) and go to “New -> User”. You will be asked for a number of things here. The user fields (first name, last name, etc) are straightforward. The user logon name is the user’s username. If you have multiple domains, make sure to select the right one.
Click “OK”, and the user is created.
Step 3: Assigning the user to a group
Go to your Organizational Unit (‘Departments’) and select the user that you want to assign to a group. When you right-click that user, and click “Properties”, a window will show with a lot of tabs. The tab you’re looking for is “Member Of”. When you click on this tab, you will see all the groups in which that user belongs. In order to add a group, which is what we want to do, click “Add”. Now type the group name and click “OK”. If the group exists, the user should now be a member of the group.
Click “OK” to save the changes.
Step 4: GPOs
Now that we have the group(s) and user(s), what we need to do is set policies for that group. To do this, go to the “Group Policy Management Console” (GPMC) on your Windows Server. You might notice it looks similar to “Active Directory Users and Computers” – just a bit more complex.
Right-click your domain in the sidebar, and click “Create a GPO in this domain, and Link it here…”. This will create a new GPO (Group Policy Object). You will now need to choose an appropriate name for your GPO. I suggest you just call it “[Group name] GPO” or “[Group name] OU”. This will create a new GPO.
Now that we have a new GPO, we need to assign groups to that GPO. We can do this by clicking “Add…” under “Security Filtering”. All groups added to that list will use the policies.
Step 5: Using policies
At this point, we want to start actually using policies. To do this, right-click your GPO in the sidebar and click “Edit…”. This will open the GPO editor. You will see two categories here: “Computer Configuration” and “User Configuration”. If you want to see what you can do with the policies, just see what policies are available by expanding the different categories.
Step 6: Updating policies
Sometimes after changing the policies, they immediately have effect. Other times, they don’t. This is why it’s always a smart idea to force updating the policies. To force update the policies, run the following command in a command prompt.
gpupdate /force
Congratulations – your policies will now take effect. For all groups that you create, create a new GPO and assign the group to that. Basically, repeat the steps in the tutorial for additional groups.
]]>Installing Windows
- Install Windows while deploying a virtual private server on AKLWEB Host.
- If you are using the “Custom ISO” feature, then first make sure that you integrate VirtIO Drivers to your Windows ISO. You can follow the steps outlined in this article.
Installing and configuring No-IP Dynamic Update Client (DUC)
- In your web browser, create an account on NoIP.com.
- Add a “DUC hostname” using their members area. For example, type your “Hostname” then click “Add Host”.
- Install No-IP DUC on your Windows VPS.
- When the client launches, sign in, then click on “Edit Hosts”. Select the “DUC hostname” that you have created in the 2nd step.
- Enable DUC to auto start:
File -> Preferences -> Start this application when user logs on. - Allow remote connections on your VPS: WIN Key + R
-> sysdm.cpl -> Remote -> Allow Remote Assistance (both).
Creating and restoring a snapshot
- After setting up DUC on your VPS, simply create a snapshot on the AKLWEB Host control panel. This is located on
My Servers -> Manage -> Snapshots -> Take Snapshot. It will take a few moments to save a snapshot of your VPS. - That’s it! Use that snapshot the next time you want to deploy that VPS.
]]>After deploying a VPS snapshot you can simply use your “DUC hostname” in any Remote Desktop Client. This saves a lot of time when you deploy VPS multiple times – as you don’t have to use your RD credentials each time.
- Get the latest binary VirtIO drivers for Windows, packaged as an ISO file, from https://fedorapeople.org/groups/virt/virtio-win/direct-downloads/stable-virtio/virtio-win.iso
- Make a folder:
c:\custom. - Extract your Windows Server ISO to:
c:\custom\winserverwith a compression tool such as 7zip http://www.7-zip.org/. - Extract the VirtIO ISO to
c:\custom\winserver\virtio. - Use an ISO mastering tool to create your custom slipstream ISO. In general, the following mastering options are needed:
- Filesystem: UDF, Include Hidden Files, Include System Files
- Make image bootable.
- Emulation Type: none
- Boot Image:
C:\custom\winserver\boot\etfsboot.com - Platform ID: 80×86
- Developer ID: Microsoft Corporation
- Sectors to load: 8
You now have a Windows ISO with built-in VirtIO drivers ready for use as a custom AKLWEB HOST ISO.
Installing
At first, no drive is present. This is normal. Click “Load Driver”.

- For Server 2008, use VISTA.
- For Server 2008r2, use WIN7.
- For Server 2012 and 2012 R2, use WIN8.
- For Server 2016, use 2k16.
For example, using 2008r2 on a 64 bit VPS:
Browse to one of the following folders (varies based on your ISO image):
- virtio > WIN7 > AMD64
- Virtio > Virtstor > Win2K8r2 > AMD
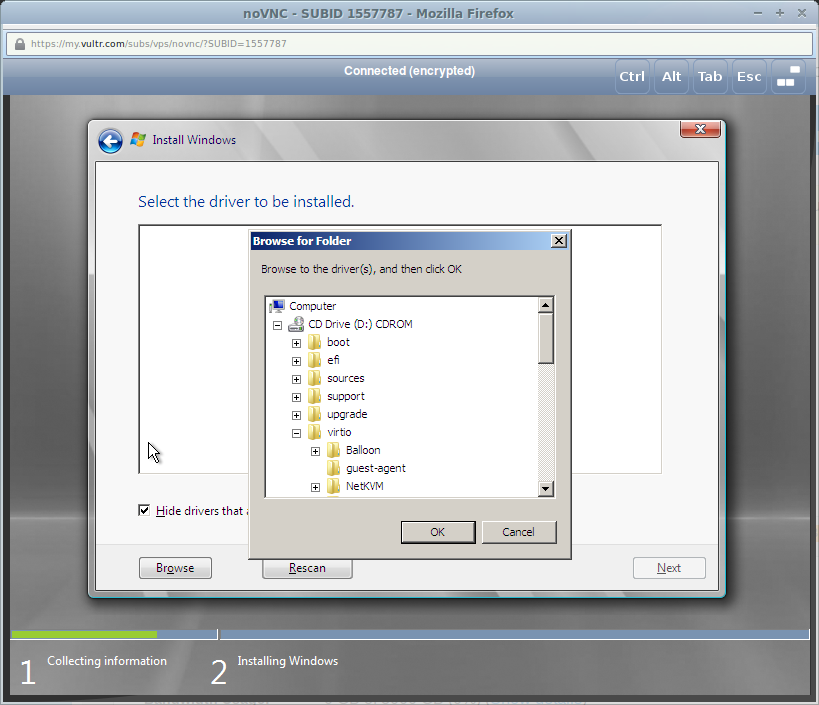
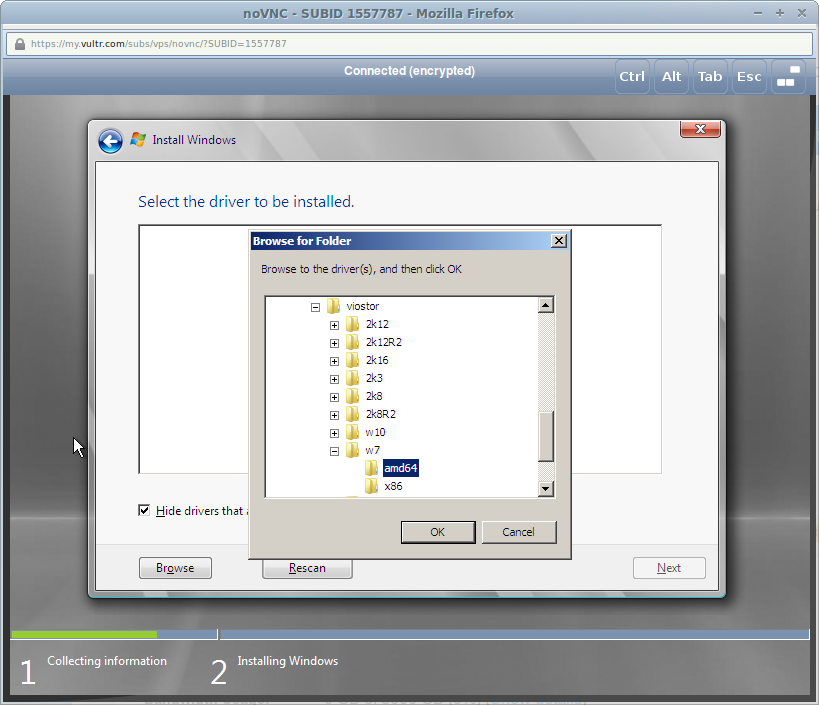
Select “Red Hat VirtIO SCSI” driver.
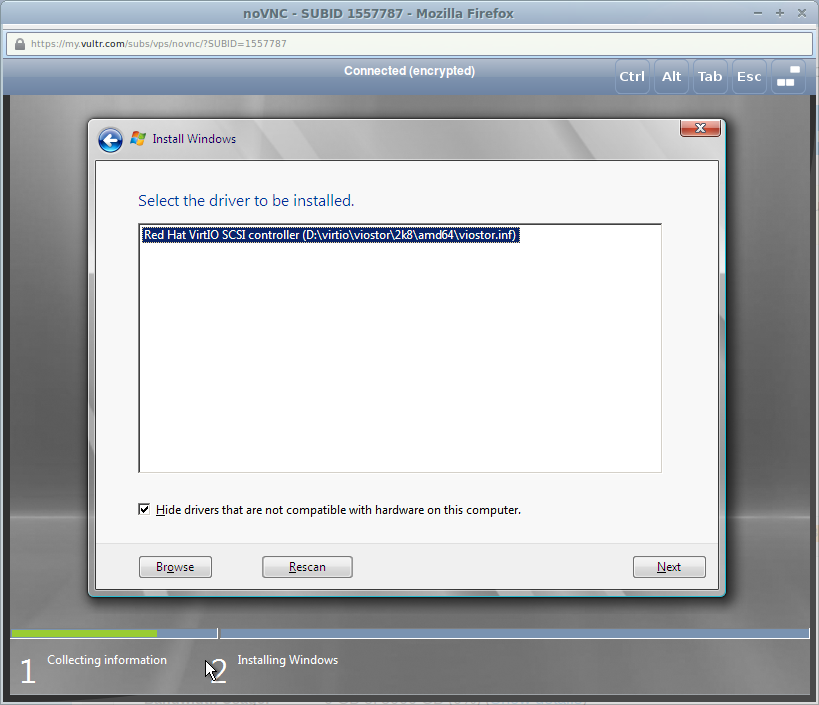
Now the drive is visible.
Additional Steps
Configuring Network Connectivity
- After you log in for the first time on your Windows VPS via View Console, you will be greeted by the Server Manager. On the upper right part of the menu, click on
Toolsthen chooseComputer Management. A new window will open. - On the left pane of that new window (will be named
Computer Management), selectDevice Manager. - You should notice 3 devices that are marked with yellow “!” signs (4 if you chose to enable
Private Networking).
Right-click onEthernet Controllerand chooseUpdate Driver Software... - Two choices will appear, choose the one below, which is
Browse my computer for driver software. - Click
Browse...and navigate toD:\virtio\NetKVM\WIN8\AMD64, then clickNext. - You will see a pop-up confirmation to verify that you want to install
Red Hat VirtIO Ethernet Adapter, just clickInstall. - Your VPS will now have internet connectivity! Perform steps 3-6 again for any more
Unrecognized Deviceson your system.
Getting Windows RDP to Work (optional)
- Though you can do just fine with AKLWEB HOST’s View Console. You can’t copy / paste text to or from it, for that you might want to install
Windows RDP (Remote Desktop Protocol). To do so, openServer Manager. - Click on
Manage, then chooseAdd Roles and Features. - It is safe to keep clicking
Nextuntil you get toServer Rolessection of it. - Scroll down a bit, and find
Remote Desktop Services, click the check-box beside it to select. Then clickNext. - You can skip the
Featurespart for now, so just clickNextagain. - Now on
Role Services, click the check-box besideRemote Desktop Session Host. - A pop-up will appear, just click
Add Features, then clickNextone last time. - Confirm your installation by clicking
Install. Your VPS will now be installingWindows RDP. - Once the installation finishes, you can reboot your VPS to apply the changes. And you’re done! You will now be able to connect to your VPS via
Windows RDP, using yourIP Address,User name(default is Administrator) andPassword.
This guide is applicable for all versions of Windows including:
- Windows Server 2008
- Windows Server 2008 R2
- Windows Server 2012
- Windows Server 2012 R2
- Windows Server 2016
Introduction
We will be using a Finnix rescue CD to recover the administrator password. Finnix is a fully self-contained Linux LiveCD that is based on Debian. It is very useful for repairing hard drives, boot records, and recovering systems.
Reset administrator password
Obtain and upload Finnix
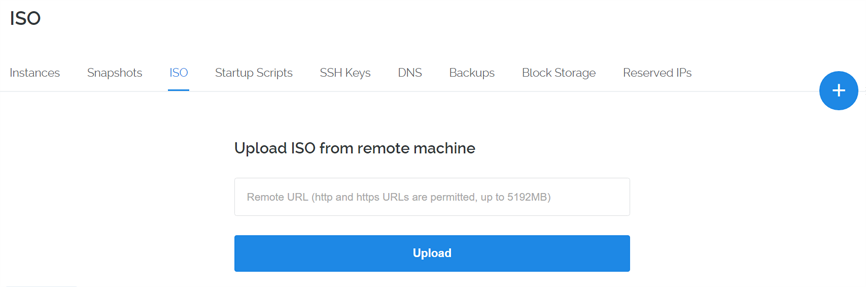
First, we need to upload a copy of Finnix. AKLWEB HOST allows you to upload an ISO by providing its URL. You may get the latest version of Finnix from this link. Copy the URL to the Finnix ISO that you want to use.
Now we need to upload the ISO. Navigate to the management panel of your instance and paste the URL in the upload field.
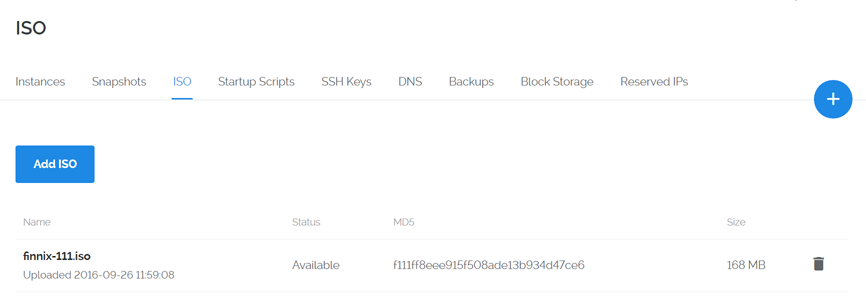
After a few moments, you will see the image labelled as “available”.
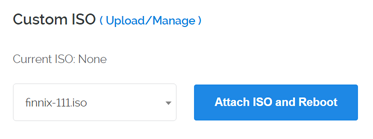
Attach and restart your instance
Get back to your management panel, select the newly uploaded ISO, then click the “Attach ISO and Reboot” button.
Then, connect to your instance console by clicking the “View Console” button. It may take a few moments for you to be able to view your instance console as AKLWEB HOST transfers uploaded ISO to your instance location.
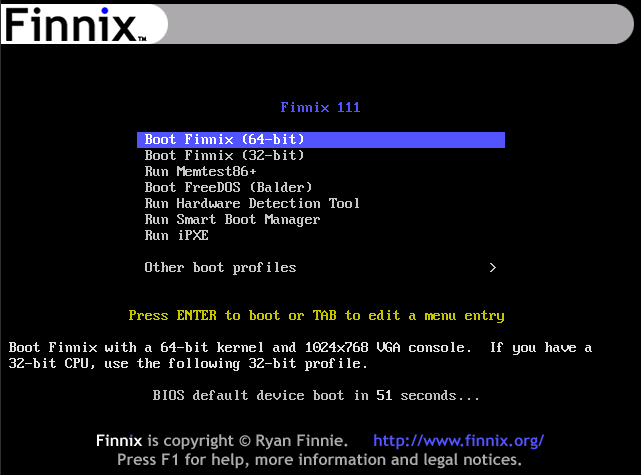
Boot with Finnix
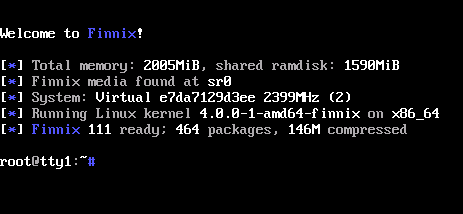
Once your machine boots, you will see the Finnix boot menu. The option “Boot Finnix (64-bit)” will be selected. Press “enter” to boot 64-bit Finnix.
After a moment, Finnix will provide you with a terminal where you can input commands.
Mount your Windows drive
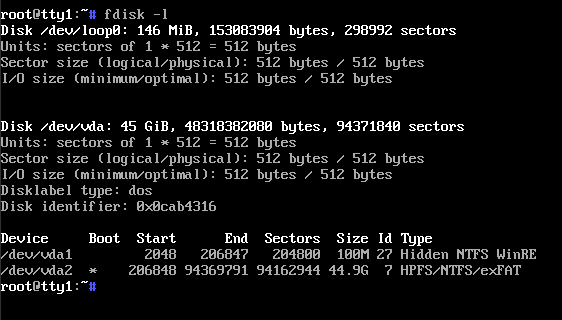
Now we need to mount the partition that has your Windows Server installation on it. Use the fdisk -l command to determine the partition device.
fdisk -l
An easy way to determine the partition device is to compare the size of the partition device to the size of your AKLWEB HOST VM. For example, I have a 45GB Windows Server 2012 plan. The output of fdisk -l shows me that /dev/vda2 has a size of 44.9G. Therefore /dev/vda2 is the partition that I’m interested in; note that yours may be named differently.
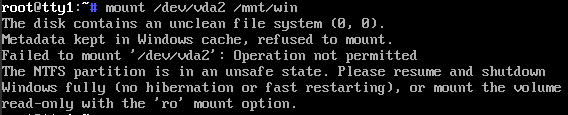
Mount the partition.
mkdir /mnt/win
mount /dev/vda2 /mnt/win
You will likely get the error shown below saying “The disk contains an unclean file system (0, 0).”. Don’t worry, that’s normal.
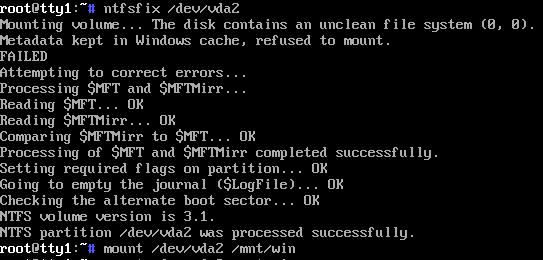
We can run the ntfsfix command to resolve this error. Replace /dev/vda2 with your partition.
ntfsfix /dev/vda2
Now you can mount the partition again.
mount /dev/vda2 /mnt/win
Clear the password
Navigate to the C:\Windows\System32\config folder.
cd /mnt/win/Windows/System32/config/
Edit the Administrator account with chntpw.
chntpw SAM
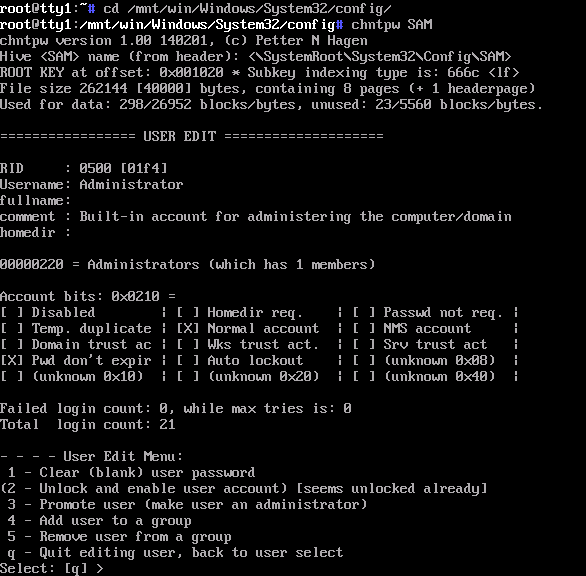
Here you may clear the administrator password and also unlock the account. The account becomes locked when you try to login too many times before attempting to reset the password. Follow these steps.
- Type
1– This clears the Administrator password. - Type
2– This unlocks the Administrator account. - Type
q– This quitschntpw. - Type
y– Confirms “yes” for “Write hive files?”.
Unmount the partition.
cd ~
umount /mnt/win
The administrator password has been reset.
Booting back to Windows
You should now remove the ISO because as long as it is attached, your server will show the Finnix boot menu when you restart it. Click “Remove ISO” on the AKLWEB HOST control panel.
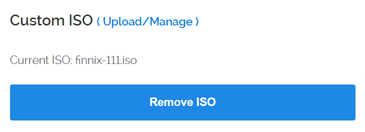
AKLWEB HOST will reboot your VPS, and you can login to Windows as Administrator with no password.
Remember to set a password after logging in. On newer versions of Windows Server, you can set your password on the Ctrl+Alt+Del menu.
]]>The control panel will assign you an IP address, you should replace “10.99.0.200” in the examples with that IP. Some configurations also require a MAC address, in which “01:23:45:67:89:ab” will be mentioned. You’ll need to replace this with the MAC address of your private network adapter.
In the AKLWEB HOST control panel, there are configuration examples generated for each of your VMs. These are located under the VM’s IPv4 settings, labeled “View our networking configuration tips and examples.“.
The examples in this guide are for IPv4, however private network interfaces on AKLWEB HOST VMs support both IPv4 and IPv6.
CentOS 6, CentOS 7
Populate /etc/sysconfig/network-scripts/ifcfg-eth1 with the following text.
DEVICE=eth1
ONBOOT=yes
NM_CONTROLLED=no
BOOTPROTO=static
IPADDR=10.99.0.200
NETMASK=255.255.0.0
IPV6INIT=no
MTU=1450
Start the interface or reboot.
ifup eth1
CentOS 8
Populate the /etc/sysconfig/network-scripts/ifcfg-ens7 file with the following text.
TYPE="Ethernet"
DEVICE="ens7"
ONBOOT="yes"
BOOTPROTO="none"
IPADDR=10.99.0.200
PREFIX=16
MTU=1450
Restart the connection, or reboot.
nmcli con load /etc/sysconfig/network-scripts/ifcfg-ens7
nmcli con up 'System ens7'
Debian 7, Debian 8
Add the following text to the /etc/network/interfaces file.
auto eth1
iface eth1 inet static
    address 10.99.0.200
    netmask 255.255.0.0
    mtu 1450
Start the interface or reboot.
ifup eth1
Debian 9, Debian 10
Add the following text to the /etc/network/interfaces file.
auto ens7
iface ens7 inet static
    address 10.99.0.200
    netmask 255.255.0.0
    mtu 1450
Start the interface or reboot.
ifup ens7
Fedora 24 – 28
Populate /etc/sysconfig/network-scripts/ifcfg-ens7 with the following text.
DEVICE=ens7
ONBOOT=yes
NM_CONTROLLED=no
BOOTPROTO=static
IPADDR=10.99.0.200
NETMASK=255.255.0.0
NOZEROCONF=yes
IPV6INIT=no
MTU=1450
Restart networking or reboot.
systemctl restart network.service
Fedora 29 – 31
Run the following commands.
nmcli con add con-name private-net ifname ens7 type ethernet ipv4.method 'manual' ipv4.addresses '10.99.0.200/24' 802-3-ethernet.mtu 1450
nmcli con up private-net
FreeBSD 10.x, FreeBSD 11.x, FreeBSD 12.x
Add the following line to the /etc/rc.conf file.
ifconfig_vtnet1="inet 10.99.0.200 netmask 255.255.0.0 mtu 1450"
Start the interface or reboot.
service netif start vtnet1
OpenBSD 6.x
Add the following lines to the /etc/hostname.vio1 file.
inet 10.99.0.200 255.255.0.0
!ifconfig vio1 mtu 1450
Reboot the system.
reboot
Ubuntu 12.xx – Ubuntu 15.xx
Add the following lines to the /etc/network/interfaces file.
auto eth1
iface eth1 inet static
    address 10.99.0.200
    netmask 255.255.0.0
    mtu 1450
Start the interface or reboot.
ifup eth1
Ubuntu 16.xx, Ubuntu 17.04
Add the following lines to the /etc/network/interfaces file.
auto ens7
iface ens7 inet static
    address 10.99.0.200
    netmask 255.255.0.0
    mtu 1450
Start the interface or reboot.
ifup ens7
Ubuntu 17.10, Ubuntu 18.xx, Ubuntu 19.xx
Populate /etc/netplan/10-ens7.yaml with the following text.
network:
  version: 2
  renderer: networkd
  ethernets:
    ens7:
      match:
        macaddress: 01:23:45:67:89:ab
      mtu: 1450
      dhcp4: no
      addresses: [10.99.0.200/16]
Update networking or reboot.
netplan apply
Windows Server 2012 R2, Windows Server 2016
Find the private interface name on your system. You can use ipconfig /all or navigate the Windows Control Panel.
Replace “Ethernet 2” with the private interface name that Windows has chosen and run the following command.
netsh interface ip set address name="Ethernet 2" static 10.99.0.200 255.255.0.0 0.0.0.0 12001:db8:1000::/64. You will need to update them with the subnet that you have been assigned.
We will be using 2001:db8:1000::100 as the main IPv6 address to assign. We will also be configuring 2001:db8:1000::200 as a secondary IPv6 address. Adding a secondary IPv6 is not necessary, but it shows the process you would use if you wanted multiple IPv6 addresses.
Important Note: If you add an IPv6 subnet to an existing machine, you must restart the server via the AKLWEB HOST control panel before IPv6 will work. Restarting via SSH or similar is not sufficient. IPv6 would not work at all until the server has been restarted. This does not apply if you have selected IPv6 during the initial server deployment.
In the AKLWEB HOST control panel, there are configuration examples generated for each of your VMs. These are located under the VM’s IPv6 settings, labeled “See configuration examples or documentation.“.
CentOS 6, CentOS 7
Add the following lines to the /etc/sysconfig/network-scripts/ifcfg-eth0 file.
IPV6INIT="yes"
IPV6ADDR="2001:db8:1000::100/64"
IPV6_AUTOCONF="yes"
IPV6ADDR_SECONDARIES="2001:db8:1000::200/64"
Restart networking or reboot.
service network restart
If you have IP forwarding enabled (using your server as a VPN or similar), you will also need to add the following lines to the /etc/sysctl.conf file. The default settings for these variables (which is 1), prevents IPv6 from working properly when IP forwarding is enabled. You can check if IP forwarding is enabled by running “sysctl net.ipv4.ip_forward“.
net.ipv6.conf.all.accept_ra=2
net.ipv6.conf.eth0.accept_ra=2
CentOS 8
Dynamic configuration
Populate the /etc/sysconfig/network-scripts/ifcfg-ens3 file with the following text.
TYPE="Ethernet"
DEVICE="ens3"
ONBOOT="yes"
BOOTPROTO="dhcp"
IPV6INIT="yes"
IPV6_AUTOCONF="yes"
IPV6ADDR_SECONDARIES="2001:db8:1000::100 2001:db8:1000::200"
Restart the connection, or reboot.
nmcli con load /etc/sysconfig/network-scripts/ifcfg-ens3
nmcli con up 'System ens3'
Debian 8
Dynamic configuration
For dynamic configuration, add the following lines to the /etc/network/interfaces file.
iface eth0 inet6 auto
Restart networking or reboot.
systemctl restart networking.service
Static configuration
For static configuration, add the following lines to the /etc/network/interfaces file.
iface eth0 inet6 static
address 2001:db8:1000::100
netmask 64
up /sbin/ip -6 addr add dev eth0 2001:db8:1000::200
Restart networking or reboot.
systemctl restart networking.service
Debian 9, Debian 10
Dynamic configuration
For dynamic configuration, add the following lines to the /etc/network/interfaces file.
iface ens3 inet6 auto
Restart networking or reboot.
systemctl restart networking.service
Static configuration
For static configuration, add the following lines to the /etc/network/interfaces file.
iface ens3 inet6 static
address 2001:db8:1000::100
netmask 64
up /sbin/ip -6 addr add dev ens3 2001:db8:1000::200
Restart networking or reboot.
systemctl restart networking.service
Fedora 26 – 28
Add the following lines to the /etc/sysconfig/network-scripts/ifcfg-ens3 file.
IPV6INIT="yes"
IPV6ADDR="2001:db8:1000::100/64"
IPV6_AUTOCONF="yes"
IPV6ADDR_SECONDARIES="2001:db8:1000::200/64"
Restart networking or reboot.
systemctl restart network.service
Fedora 29 – 31
Run the following commands for dynamic IPv6 configuration, and one additional IPv6 address (/128). Additional addresses can be added in the same fashion.
nmcli con mod 'Wired connection 1' ipv6.method 'auto' ipv6.addresses ''
nmcli con mod 'Wired connection 1' +ipv6.addresses '2001:db8:1000::200/128'
nmcli con up 'Wired connection 1'
FreeBSD 10.x, FreeBSD 11.x, FreeBSD 12.x
Dynamic configuration
For dynamic configuration, add the following lines to the /etc/rc.conf file.
ifconfig_vtnet0_ipv6="inet6 accept_rtadv"
ipv6_activate_all_interfaces="YES"
rtsold_enable="YES"
rtsold_flags="-aF"
Start the router solicitation daemon or reboot.
service rtsold start
Static configuration
For static configuration, add the following lines to the /etc/rc.conf file.
rtsold_enable="YES"
ipv6_activate_all_interfaces="YES"
rtsold_flags="-aF"
ifconfig_vtnet0_ipv6="inet6 2001:db8:1000::100 prefixlen 64"
ifconfig_vtnet0_alias0="inet6 2001:db8:1000::200 prefixlen 64"
Start the router solicitation daemon or reboot.
service rtsold start
OpenBSD 6.0 – OpenBSD 6.2
Add the following lines to the /etc/hostname.vio0 file.
inet6 autoconf -autoconfprivacy
inet6 alias 2001:db8:1000::200 64
Restart the interface or reboot.
sh /etc/netstart vio0
OpenBSD 6.3 – OpenBSD 6.6
Add the following lines to the /etc/hostname.vio0 file.
inet6 autoconf -autoconfprivacy -soii
inet6 alias 2001:db8:1000::200 64
Restart the interface or reboot.
sh /etc/netstart vio0
Ubuntu 14.04
Dynamic configuration
For dynamic configuration, add the following lines to the /etc/network/interfaces file.
iface eth0 inet6 auto
Reboot the instance.
Static configuration
For static configuration, add the following lines to the /etc/network/interfaces file.
iface eth0 inet6 static
address 2001:db8:1000::100
netmask 64
up /sbin/ip -6 addr add dev eth0 2001:db8:1000::200
IP forwarding
If you have IP forwarding enabled (using your server as a VPN or similar), you will also need to add the following lines to the /etc/sysctl.conf file. The default settings for these variables (which is 1), prevents IPv6 from working properly when IP forwarding is enabled. You can check if IP forwarding is enabled by running “sysctl net.ipv4.ip_forward“.
net.ipv6.conf.all.accept_ra=2
net.ipv6.conf.eth0.accept_ra=2
Ubuntu 16.04
Dynamic configuration
For dynamic configuration, add the following lines to the /etc/network/interfaces file.
iface ens3 inet6 auto
Restart networking or reboot.
systemctl restart networking.service
Static configuration
For static configuration, add the following lines to the /etc/network/interfaces file.
iface ens3 inet6 static
address 2001:db8:1000::100
netmask 64
up /sbin/ip -6 addr add dev ens3 2001:db8:1000::200
Restart networking or reboot.
systemctl restart networking.service
Ubuntu 17.10, Ubuntu 18.xx, Ubuntu 19.xx
Populate the /etc/netplan/10-ens3.yaml file with the following text.
network:
  version: 2
  renderer: networkd
  ethernets:
    ens3:
      dhcp4: yes
      addresses:
        - '2001:db8:1000::200/64'
Update networking or reboot.
netplan apply
Windows Server 2012 R2, Windows Server 2016
Find the public interface name on your system. You can use ipconfig /all or navigate the Windows Control Panel.
Replace “Ethernet” with the public interface name that Windows has chosen and run the following commands.
netsh interface ipv6 set global randomizeidentifiers=disabled
netsh interface ipv6 add address interface="Ethernet" address="2001:db8:1000::100/64"
netsh interface ipv6 add address interface="Ethernet" address="2001:db8:1000::200/64"